The mysterious art of beat mapping in Logic
4 December 2008
So, for my sins (and because I have one studio more that everyone else) I've been given the job of doing the early stage mixing of six new Caedmon tracks.
When we first started recording, we decided to work to a click track because it would make everything much simpler when it came to drop ins and edits and loops and the rest. By the time we came to the second recording session, we had binned the idea of click tracks and recorded everything 'live'.
Being the anal kind of guy who expects bar markers on the screen to line up with the bars we're playing, I decided to explore what's called 'beat mapping' once again. I'd wasted the best part of a day trying to do this on the 50th Anniversary Retreat and failed, but now I had the advantage of Google and Youtube on my side.
Here is the before and after, so you can see what I'm talking about:
Beat mapping - before and after
And this is how to Beat your Map in Logic
So, without further ado, this is how to make your click track follow your performance instead of the other way around.
-
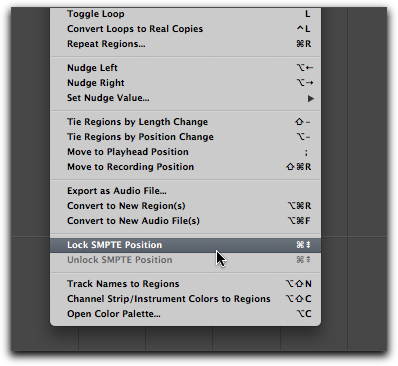
This is essential, and not always mentioned in other tutorials: lock your regions to SMTPE time code before you start. Otherwise, if your regions start at different positions or you have multiple regions per track, Logic will happily shift the regions to match the new bar positions you're going to create and your recording will fall apart. So select all regions, and using the contextual menu, choose 'Lock SMTPE position'.
-
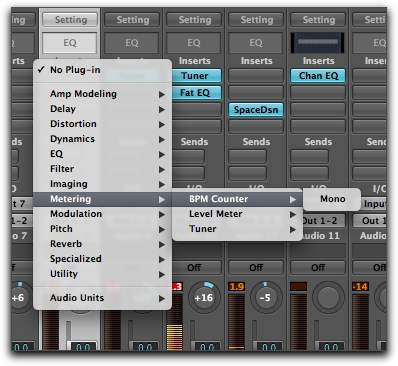
Unless you've already fiddled with it, your current BPM is likely to be set to 120bpm. Use the BPM counter plugin on one track to give you some idea of the general tempo - preferably something simple like a kick. When you have a good idea of the average tempo, set it in the transport bar.
-
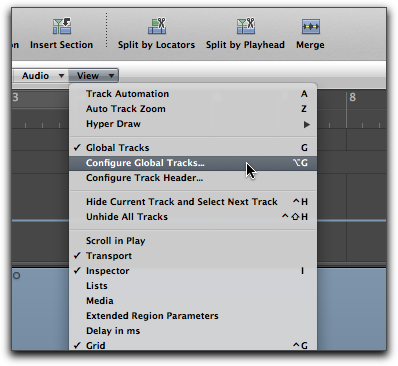
Beat mapping is a 'Global Track'. You'll probably need to expose it by modifying the Global Track configuration. So use the View menu in the arrange window to display your Beat mapping.
-
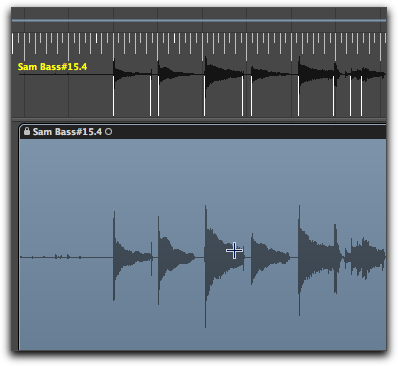
Now select the track that you're going to use to set the tempo and define the bars. Again, something like a kick track is ideal, but in this case I didn't have that luxury and used an acoustic guitar track (yes, I know the picture says 'Sam Bass'. OK, so the acoustic guitar got recorded on the track previously called Bass. I'll rename it - don't worry about it).
With the track selected, click 'Analyse' in the beat mapping section. Logic will display lines to indicate what it calls the 'transients' on that track, below the bar and beat markers. Now all we have to do is line them up. Use the sensitivity box to increase or decrease the number of transients to suit.
-
Now comes the magic part. Using your pointer tool, click on a bar marker on the Beat mapping track, and drag down to the transient which matches that beat position. Advance along the track doing this once for every bar. Unless the timing really does drift dramatically, matching the first beat in every bar should be enough. Check your progress every so often by playing the track with the click switched on.
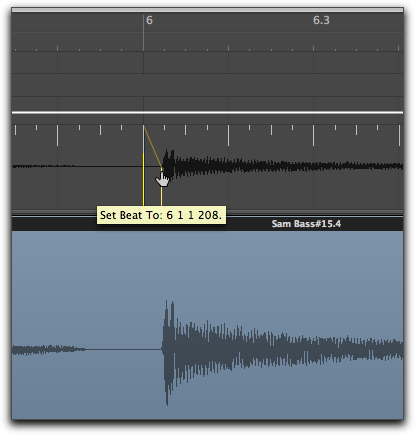
And that's it. Now you can work on your track secure in the knowledge that going to bar 36 will actually take you to bar 36. You can slap in Apple loops that will stay in time with your drifting tempo. You can happily cycle 4 bars while tweaking.
Credits
It would have taken ages to work this out without the beatmapping video tutorial on Youtube by SFLogicNinja and the advice in the Apple Logic forum.
(Below is an update to the original post, added in response to my own troubleshooting and Lionel Cartwright's comment below)
Increase the sensitivity
If you can't get the 'on the bar' beats all the time, try increasing the sensitivity and mapping one of the beats inside the bar. Maybe you can catch a snare on the 2 and 4? The tempo track doesn't have to change exactly on the first beat of each bar, as long as it keeps in time.
Use multiple tracks
If you have the luxury of a multi-track recording, try selecting one of the other tracks just for the difficult bit. The beat mapping doesn't have to rely on the transients from the same track all the way through.
Just don't click on the 'Detect' button, which will attempt to remap your whole tempo track for you, using the newly selected track.
Make your own tempo guide
Or just make your own! Create a new software instrument track. Load up a drum kit into the new track.
Now hit Caps Lock and your little virtual keyboard will pop up. Press '4' to select octave 1 and hit 'T' to get a closed hi-hat (A cowbell would be good as well). Now set the track to record and play 4 to the bar hi-hat through the difficult area - or all the way through if you want. If any of your recorded hits are a bit rough in timing, you can edit them manually until they groove along nicely. Just don't try quantizing!
Now, make sure that you've locked the SMTPE position on your new tempo guide track as before, and go back to the Beat Mapping panel. Check 'Protect Midi' to prevent the tempo track moving your notes, select your new tempo guide track, and see if you can't match up those last recalcitrant beats to your 4 to the bar hits.

Comments
Lionel Cartwright
2009.10.19 16:04
#1
I've been beatmapping a project I'm producing. Love it. One problem has been when Logic fails to insert a obvious transient (beginning of a bar, where there's a kick drum). I need to be able to insert a transient. Haven't been able to figure that out yet. (Tried the control-click/move to nearest beat, but still doesn't put it where I want it.)
Thanks for any input,
Lionel
James
2009.10.19 22:25
#2
I think you might want to try creating your own tempo guide track - sometimes it's easier just to do it yourself. I've added an update to the post to explain.
Hope that helps.
Tom Hartman
2009.10.24 04:28
#3
Same problem, I am finding I need to ADD a mark here and there and can't figure out how to do it. What a pain.
Doing the "Beats from Region" thing only works sometimes. You can think you've got a pretty good click track together, then choose Beats from Region to create the new click track, and then when you go to put on drums you often end up with a pretty herky jerky track.
Nuendo does this really well, and even Pro Tools makes it easy by allowing you to "Identify Beat" at any point in the song. You hit "Command I" and a window pops up and you type in the bar and beat number.
TH
James
2009.10.24 09:23
#4
Not sure I understand your workflow here. When you say you've "got a pretty good click track together" and then you create a new click track using beats from region, what do you mean?
Tom Hartman
2009.10.24 04:30
#5
James, on locking to SMPTE, I'm a bit confused. If I have a kick drum that hits at BAR 2 Beat ONE, but it isn't quite locked in, and I adjust the tempo track via Beatmapping so Bar 2 beat one lines up better with the track I'm matching, don't I WANT the program to move my kick drum to where the new Bar 2 is located? If it were locked, it would stay where it was right?
Confused...
Tom
James
2009.10.24 09:54
#6
Yup. Logic adjusts the tempo of the previous bar so that bar 2 starts at the same time as your kick.
If your guide track (ie: the region you are using to dictate the tempo) is one continuous region and you don't have any other regions, then yes, you can just move it to line up with the pre-existing bar 2.
But if you have other regions, then it gets messy real quick.
Say your tempo is 120bpm. That means a bar every two seconds. For the sake of argument the first bar is at 0 seconds. That means bar 16 is at 16 seconds if everyone plays like clockwork. But your performer slowed down through the 16 bar intro, and the bass player actually came in at 17 seconds.
So it doesn't matter what you do with the tempo track, the bass MUST come in 17 seconds after the start, even though it's still 16 bars as far as the musicians are concerned.
Now, your bass region is neatly trimmed and your unedited tempo track is an even 120 bpm. That means the start of your bass region is actually positioned at bar 16 beat 3 - 17 seconds in. When you adjust the tempo track to make 16 bars stretch across 17 seconds, Logic will keep your bass region at 16:3:1 - so by the time you've mapped those 16 bars, the bass will be two beats late.
But if you lock the bass region to SMPTE, Logic will keep the bass at 17 seconds, so regardless of your tempo editing it will always come in in sync with the other tracks.
Tom Hartman
2009.10.24 16:55
#7
I do a lot karaoke work. This means they send me the real recording, I load it into Logic, and I have to create a tempo track that exactly matches the real song.
So I get a feel for the tempo and use that as a starting point after trimming the beginning of the real song and spotting it say, at BAR 2 so I can have bar one as a count in. At that point, unless it's a dance track cut to a steady click, I am now officially in hell and have to create this matching tempo track. SOMETIMES...if it's a flowing orchestral thing with not much of a backbeat, I just make a midi track and tap along with the real track. At the end, I highlight that "tap track" and choose BEATS FROM REGIONS, then Quarter Notes, and voila, I'm done. If I try this with a track that is a live rhythm section, say an old Doobie Brothers tune or something, it often doesn't work, because although to the ear it sounds like my homemade click is pretty much with the original, when I program drums in to match the original, now you can start hearing that it wasn't as tight as you thought, and there are little jerky spots here and there. I can go in of course and adjust, but often there is too much to adjust.
So in the last couple days, I've been trying the other method, using DETECT, getting the transients, and going in and hand placing the beats. Usually one each bar is good as you say, but every once in awhile I'd like to add a transient. Someone tipped me off that if you hold the control and shift key, you can drag a bar marker into the space where you want to add a transient and it will do it. It does!
Now I'm going to go read your explanation on the Locking thing and see if my poor addled brain can understand it...;)
Thanks
Tom
James
2009.10.24 20:19
#8
Ah... I see where you're coming from.
Not much need for the SMPTE lock then. It's really when you've got have a dozen tracks sliced into regions scattered all over the arrange window that it becomes necessary.
James
2010.02.18 23:55
#9
Hmmm... If I understand you correctly, you're trying to edit an acappella track to sit tight with a 125bpm rhythm track? Sounds like you need to decide whether to use beatmapping to follow the acappella and let the bpm wander about (so that the drum track speeds up and slows down to match) or just stick to 125bpm and stretch or squeeze the acappella to fit, a phrase at a time.
That might be the easier solution, because trying to get an accurate beatmap using vocals with no rhythmic beat means no transients for Logic to lock onto. You'd need to try tapping in your own beat and that's not as easy as it sounds.
Tom Hartman
2010.02.23 21:45
#10
Hi Jim,
OK question.
I have gotten very good at tempo mapping existing audio tracks by going through and drawing the bar lines where they should be, etc.
Before I started doing this, I used to just tap out a track in midi, while listening to the original, and then use the "BEATS FROM REGION" feature to create a matching tempo track. Problem is, often this sounded jumpy here and there, and now I want to go back and use the new method of drawing in the bar lines where they should be, etc.
The song is in midi, so I am wondering what this will do to everything, I'm sure it wil through it off. Will I have to replay everything? Any suggestions appreciated.
Tom
Tom Hartman
2010.02.23 21:54
#11
PS ...
I started to fool with a copy of the file, and Logic is not letting me adjust any barlines, that is I can't draw or adjust existing ones without getting the message "This would have caused the tempo to be too low, try inserting bars."
What is this all about?
Thanks
Tom
James
2010.02.25 02:12
#12
Logic does have 'alternative tempo' tracks. You could try selecting alternative tempo track 2 and then drawing in your beats on there. Note also the option to 'protect midi' whilst beat mapping.
Having said that, I haven't used either feature so I can't guarantee the results.
Tom Hartman
2010.07.20 06:28
#13
PS...there was no midi yet in this project, I was merely creating a tempo map before recording...
Tom
caynick
2010.02.18 22:42
#14
hey & thank you! great tutorial
i am trying to get an acapella to my 4/4 125bpm grid but i am struggling, 1st verse is great but soon after i lose it, the BPM changes that happen due to nudging from beat mapping make it sound/look wrong, any tips?
appreciated
nick
caynick
2010.02.18 23:01
#15
what I mean is i end up with all manner of BPMs in the vocal track & i struggle to get it all to 125 to allign with my drum track
very hard to get info on all this, thanks for your site!
James
2009.12.10 22:15
#16
Probably not - at least not without seeing your Logic arrangement. :(
Is it the tempo track that's making it skip the beat or is it a misaligned region?
If you zoom in really close can you see that first waveform after the bar marker?
jamie delio
2009.12.10 21:22
#17
hi when my beat kicks back in after a break down it skips the first beat and u cant hear it. can u help
Tom Hartman
2010.07.20 06:27
#18
Jim,
I had a weird one tonight. I was beatmapping a very difficult orchestral thing that had no percussion and I had to go through the whole song and draw the barlines. The first 21 bars were very indistinct, so I actually started beatmapping it at bar 22, where some semblance of rhythm began. Once I got that, I went back to the start to begin tackling bars 1-21. I got them alright, but ....it through everything else in the song off.
I was under the impression that since I had drawn a downbeat at bar 22, everything from then on would remain how I had mapped it, but no dice.
Is there a solution for this?
Thanks
Tom
da bishop
2011.09.09 19:49
#19
Transient markers are edited in Sample Edit. Hit command T to toggle the marker editing mode.
Add new comment